During our recent glamping holiday to Whitby in a vain attempt to stir ourselves from a mid holiday slumber we went for a short drive to Robin Hoods Bay for a brisk walk along the beach.
Robin Hoods Bay is the pinnacle of cute seaside towns, we enjoyed some delicious food and coffee in Bramblewick cafe, and a good peak in all the cute little holiday cottages.
Saturday, 16 August 2014
Friday, 15 August 2014
Craft Club: Meeting No:1
So I love to craft, whether it's sewing, knitting, baking, home making, anything really, and I love to learn a new skills. However, sometimes on top of running a cafe, keeping a nice home, cooking meals, and keeping a blog, the hobbies such as crafting 'just for fun' get left by the wayside. One evening whilst in the pub we started discussing how nice it would be if there if there was a group in Ripon where anyone also interesting in doing and learning new crafts could get together and craft, learn from each other and generally just hang out. A combination of a WI but not as official and workshops but not as expensive. So we set one up and called it....drum roll please....Ripon Craft Club!
We held the first one last week, check out Thimble and Rose blog for more on how it went. It was small but lovely and we have since developed quite a following on the Facebook page, so I'm thinking a few more people might make it to the next one.
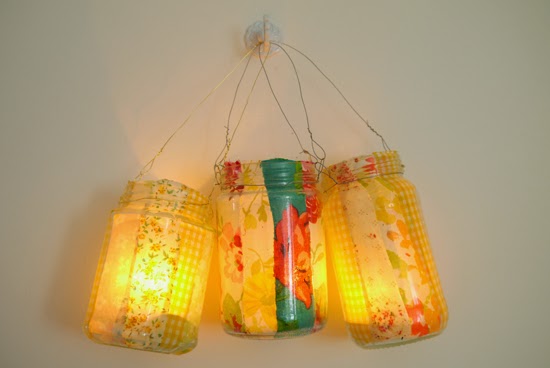
We kept with something simple, jam jar lanterns, each of us customizing a jar to pop a tea light in.
You will need:
A jar
Scissors
Scraps of fabric
PVA glue
Brush
Wire
Battery tea light
See Thimble and Rose blog on how to make the wire hangers.
We held the first one last week, check out Thimble and Rose blog for more on how it went. It was small but lovely and we have since developed quite a following on the Facebook page, so I'm thinking a few more people might make it to the next one.
We kept with something simple, jam jar lanterns, each of us customizing a jar to pop a tea light in.
The options for jar crafts are endless, here's what a I did with mine.
You will need:
A jar
Scissors
Scraps of fabric
PVA glue
Brush
Wire
Battery tea light
Cut strips of fabric about 2cm thick that will cover the length of the jar.
Pva with your brush the inside of the jar, just do this bit at a time, i.e. enough to stick one piece of fabric down. Place your strip of fabric over the glue and paste more glue over the top and move on the the next bit, over lapping the fabric strips a little. Once the whole of the inside of the jar is covered, trim the excess fabric from around the rim of the jar. See Thimble and Rose blog on how to make the wire hangers.
This took ages to fully dry, like 3 days! As a precaution I used a battery tea light instead of a real one due to the glue and fabric. Battery fairy lights would look cool too!
Next months craft is dream catchers and I've already started 'researching' and by that I mean I've been looking up dream catchers on Pinterest, lots! Anyone in the local area is more than welcome, check out Ripon craft club on Facebook for times, dates and location. This is a completely for fun group to meet like minded people and learn some new skills, even for those of you whose crafting extends to cutting, sticking and just about coloring inside the lines, come join us xx
Tuesday, 12 August 2014
Spiced and Crunchy Broad Beans
Hatty and I did a great W.I. swap the other day. I gave her some of the Gooseberry and Elderflower jam and she gave me some home grown broad beans. I've never really done anything with broad beans before and it was quite a glut, so I wondered if they could be made into a tasty snack... the answer was a resounding YES!
Emily x
- 200g fresh broad beans
- 50g plain flour
- 25g brown sugar
- Big pinch of salt
- Little sprinkle of cayenne pepper
- A twist of black pepper
- 1 crushed garlic clove
- A glug (4 tbsps.) olive oil
If you beans are still in pods, open them up (by bending in half) and pop then out - I found this very satisfying. Then steam them for about 5 minutes.
Put all the ingredients in a bowl to make a batter and fully coat the beans in it. (I found that they didn't fully coat but I think this may have been because my beans were wet so maybe pat them dry after steaming).
Spread them out on a greased baking tray and bake in a pre heated oven at 180 degrees/gas mark 5 for 35 minutes.
As I said mine weren't fully coated and the batter did fall off a bit, but they are still delicious and a great snack or something to offer as alternative nibbles with drinks.
Monday, 11 August 2014
DIY Thank You Cards
When we were little we would always write 'thank you' cards after each birthday and Christmas. Rebecca, the eldest, would be tasked with writing a list of who got what from who and a few days after the event we'd sit down and write our thank-you's. I have continued this with Millie as I think it's important to say thank you properly and it provides a little keep-sake should the recipient like (for example I have friends who live abroad and their daughter's thank you cards usually include a photo of the girls, which I like to keep up until the next one arrives).
Obviously, Millie isn't big enough to write her own thank you's, so for now it is my task. In the past I've used a photo of Millie or a hand print and made the cards myself. After her birthday there was so much chaos I very nearly bought some cards, then I remembered a little gem I bought in France and decided instead to have a play!
I love letters and fonts and stamps and I found this little collection in a vintage shop (ish, it's not a brocante really, its too clean and nice and run by a Dutch lady) in Quillan, France. It isn't a complete set of the alphabet so I had to adapt a little (using an 'n' and an 'l' to make an 'h').
I touched on the rainbow theme again and instead of using ink I used acrylic paint, which meant I got a lovely bright, bold colour. I painted the colour onto the stamp but only used a tiny amount, otherwise the letters will lose their definition.
I love how imperfect they are and that they are quite child-like... now what else can I stamp?
Emily x
Sunday, 10 August 2014
Spiced Plum Cake
Seen as it feels like Autumn today, this is a perfect Autumn warmer cake. I used a basic 8oz cake mix and added in a mix of dried spices with the plums. It's a popular choice in the cafe with a cup of Amertto tea.
8 oz sugar
8 oz margarine
4 eggs
1 tsp baking powder
8 oz self raising flour
1/2 tsp ginger
1/2 tsp cinnamon
1/2 tsp nutmeg
4 plums - stones removed and chopped
handful brown sugar
Beat the sugar and margarine together until light and fluffy, then beat in the eggs. Add the baking powder, flour and spices and give a good mix. Spoon half the mixture into a greased and lined 10" loose bottomed tin, layer half the plums over the cake mix, then spread the rest of the cake mix over the plums, then top with the remaining plums and sprinkle with brown sugar. Bake at 170 C for 50 mins-1hr.
You can adjust this recipe with other fruits and spices to keep it seasonal, such as pear and ginger or apple and cinnamon.
8 oz sugar
8 oz margarine
4 eggs
1 tsp baking powder
8 oz self raising flour
1/2 tsp ginger
1/2 tsp cinnamon
1/2 tsp nutmeg
4 plums - stones removed and chopped
handful brown sugar
Beat the sugar and margarine together until light and fluffy, then beat in the eggs. Add the baking powder, flour and spices and give a good mix. Spoon half the mixture into a greased and lined 10" loose bottomed tin, layer half the plums over the cake mix, then spread the rest of the cake mix over the plums, then top with the remaining plums and sprinkle with brown sugar. Bake at 170 C for 50 mins-1hr.
You can adjust this recipe with other fruits and spices to keep it seasonal, such as pear and ginger or apple and cinnamon.
Saturday, 9 August 2014
Fire pit
For Christmas my sister Becca and her boyfriend Pato, gave Mike and I a fire pit, and we've been waiting months to test it out. After getting back off holiday and enjoying a lovely picnic and bike ride, the fire pit and a glass of wine seemed like the perfect way to end the day.
So we pulled out the vintage deck chairs, rummaged in the back of the cupboard for some marshmallows and poked the fire pit into action.
It was so relaxing, sitting, drinking, watching the flames and dreaming about our future.
So we pulled out the vintage deck chairs, rummaged in the back of the cupboard for some marshmallows and poked the fire pit into action.
It was so relaxing, sitting, drinking, watching the flames and dreaming about our future.
Subscribe to:
Posts (Atom)