This project took place nearly a year ago. For my 27th birthday I asked Mike to do a fix up job on my bike. My bike was in quite bad disrepair. Unfortunately I wasn't as on it with the 'before' and 'after' photos as I am now so I don't have any pictures of what it looked like prior to its make over. Basically it was a bit rusty, the tyres were tattered, and I had lost the bolts for the front wheel, (below is a picture of a bike in a similar state, although admittedly mine was a little worse). All in all, it needed to a good service and I was inspired by pictures on pinterest to give it a new coat of paint and a basket... or two!
This was quite a lengthy process, and again I have no photos to show you of the process as I wasn't blogging at the time but its such a beautiful bicycle now I wanted to share it with you.
1.First of all take the bike to pieces, leaving you with just the frame, photograph as you go to make sure you can get it all back together again.
2.Mask off any stickers, badges that you don't want to be painted but don't come off.
3.Rub down the frame gently with a abrasive pad.
4.In a well ventilated area, where the conditions are dry and warm spray the frame with a primer, I recommend rust-o-lume brand for spray paints.
5.Spray according to the instructions on the can.
6.Leave to dry for 12 hours
7.Next do the first coat of the colour you have picked, again different spray paints may vary but they always have instructions on the can.
8.You may need to do a few coats and I recommend leaving 12 hour in between each coat, I know, I said it was a lengthy process!
9.Mike sprayed my bike a beautiful green and the wheel trims a contrasting white.
10.Give the wheels a good clean and replace tyres / inner tubes if necessary. Good bike servicing tips can be found on you tube.
11.Final but it all back together, place baskets in place and go for a test ride!!
Thursday, 19 June 2014
Wednesday, 18 June 2014
Tortilla Pizza
Tortilla pizzas are one of the easiest, quickest meals on those 'I can't be bothered to cook nights', for Hatty and I that would always be Friday night. When we lived together and worked a 9-5 Monday to Friday, by Friday night we could not be bothered to do anything other than have a large glass of wine, put on a good film and eat pizza!
However, ordering in pizza once a week doesn't do much for your waistline or your bank account so we started making tortilla pizzas. They make the perfect thin and crispy base, are way less fattening than a full on pizza, they take minutes to make, and cost a fraction of the price of a bought pizza.
It's pretty simple:
1. Place a tortilla wrap on a baking tray.
2. Spread it with tomato purée
3. Cover with cheese of your choice.
4. Top with toppings of your choice
5. Bake in the oven at 180 c for about 5-10 mins
Now these are still a regular weekday meal for us and would also be a great one to do with kids, let them put their own toppings on, they'll love it!
Emily x
Tuesday, 17 June 2014
Popcorn
Popcorn is amazing, and depending on what you choose to smother it in, it can work out to not be the most outrageous of naughty but nice snacks.
Buying plain corn kernels rather than ready made popcorn or the microwave kind has lots of benefits. It's much cheaper, you don't need a microwave (which I don't have), and you can put whatever you want on it.
Instructions
1. Cover the bottom of the pan in oil, and heat up.
2. Once the oil is hot cover the base of the pan with the kernels.
3. Hold the lid on the pan while the kernels pop, keep shaking the pan a little.
4. Once the popping has steadied to once every couple of seconds, take off the heat.
5. I like to simply sprinkle mine in salt, but you can stir in some caramel when its still hot and wait for it to cool a little before scoffing!
Curl up with you favourite film and tuck in. See my previous post for my top 10 films. Hatty x
Buying plain corn kernels rather than ready made popcorn or the microwave kind has lots of benefits. It's much cheaper, you don't need a microwave (which I don't have), and you can put whatever you want on it.
Instructions
1. Cover the bottom of the pan in oil, and heat up.
2. Once the oil is hot cover the base of the pan with the kernels.
3. Hold the lid on the pan while the kernels pop, keep shaking the pan a little.
4. Once the popping has steadied to once every couple of seconds, take off the heat.
5. I like to simply sprinkle mine in salt, but you can stir in some caramel when its still hot and wait for it to cool a little before scoffing!
Monday, 16 June 2014
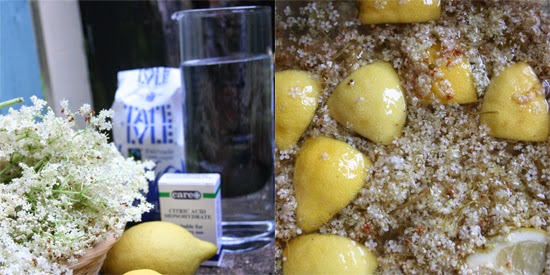
Elderflower Cordial
I love Elderflowers! Not only do they make lots of things yummy (including jam and cocktails, watch this space) but they also tell you summer is well and truly on the way. Suddenly hedgerows are emblazoned with these white, fluffy flowers, certainly where we live you do not need to wander far in order to make a harvest. Therefore, with the help of Millie, this is just what we did.
We've made cordial with our crop because we can then use this in future recipes. We used a recipe from, "Through the Kitchen Window" by Susan Hill. It's a delightful book that takes you through the English seasons in a magically innocent way, it'll have you craving picnics one minute and cosy roaring fires the next.
For cordial you will need:
25 elderflower heads
2lbs sugar
2 lemons grated, squeezed and cut into chunks
2oz citric acid (available in Pharmacies)
2 pints of cooled boiled water
1. Dunk the flower heads into cool water to wash
2. Cut the flowers from the stems and put into a large bowl
3. Add sugar, lemons and citric acid then cover with water and leave for a couple of days stirring occasionally. Put a tea towel over the top to stop any flies getting to it.
4. Using a clean tea towel strain the liquid into a jug
5. Pour into clean bottles with lids (we used a Kilner bottle and two beer bottles)
6. Keep in the fridge. Dilute to taste.
![]()
Emily x
|
Sunday, 15 June 2014
Biscuit Tiffin
This is one of the easiest and most yummy chocolate tray bakes ever to grace the earth. You think rocky road is good? You haven't lived chocolate heaven until you've had this tiffin. The hardest thing about it is waiting for it to set before tucking in!
makes 18 (big chunks!)
300g chocolate digestive biscuits
100g glace cherries
100g sultanas
200g dark chocolate
200g milk chocolate
4 tbsp golden syrup
250g butter
Bash up biscuits and add sultanas and chopped up
cherries.
Melt chocolate, golden syrup and butter in a bowl over a pan of boiling water.
Pour melted ingredients into the biscuit mix.
Friday, 13 June 2014
DIY: Gift Book
I first made one of these a couple of weeks ago for someone who's birthday present was a membership and a day out so there was nothing to unwrap. Making a little book with photos and poems made an extra little keep-sake and was much more exciting than just being told what was going to happen.
I then decided to make one for my husband for his first Father's Day. It's just a little keepsake and was lovely to make and hopefully will be lovely to receive on Sunday!
Gather together lots of pretty bits of paper and card (I have a slight obsession with stationary and paper so I tend to buy things when I see them on sale or in discount stores and consequentially have boxes full of pretty paper!) Paul loves maps so I've put an old road map into my mix. Try to stick to a theme, or two to three colours.
1. Choose your front cover and fold lengthways into thirds. Make one third into a point.
2. Fold the paper as thus
3. Fold the point over and chop it off if it extends over the top... this creates pockets on the inside of the cover.
4. Fold in half and chop about an inch off the front side and fold the back cover over the front - hope that makes sense!
You now have the cover of your book... time to add pages!
I then decided to make one for my husband for his first Father's Day. It's just a little keepsake and was lovely to make and hopefully will be lovely to receive on Sunday!
Gather together lots of pretty bits of paper and card (I have a slight obsession with stationary and paper so I tend to buy things when I see them on sale or in discount stores and consequentially have boxes full of pretty paper!) Paul loves maps so I've put an old road map into my mix. Try to stick to a theme, or two to three colours.
Then create! I admit, I'm rubbish at planning and like to dive straight in and see where it takes me, but if you like instructions I have tried to take you through what I did...
1. Choose your front cover and fold lengthways into thirds. Make one third into a point.
2. Fold the paper as thus
3. Fold the point over and chop it off if it extends over the top... this creates pockets on the inside of the cover.
4. Fold in half and chop about an inch off the front side and fold the back cover over the front - hope that makes sense!
You now have the cover of your book... time to add pages!
5. Add extra pages - as many as you think you can fill! They can be all different pages or the same - I've only added one folded piece of paper which essentially adds four pages.
6. Once you have your desired number of pages fix in place. If you have a big enough stapler you can use this or stitch them together by doing a long running stitch along the spine.
7. Add envelopes (I cut this one down and put it back together with washi tape so it fitted the page), extra post its, pretty bits of paper - just use a glue stick.
8. Add the personal touches - photographs, poems, sentiments - if you have bought tickets slot them in a pocket, what a lovely surprise that would be for someone!
Then finish off with a label and a closing mechanism - here I've used a peg but you could use two buttons with tied string, poppers or even Velcro!
I want to make these for everyone - so watch out people I buy gifts for!
And Happy Father's Day for Sunday lovely Daddys!
Emily x
Thursday, 12 June 2014
No Pastry Quiches
These are great for the whole family and particularly good for Baby-Led Weaning or moving your little one onto finger foods. What I love about them is firstly, they are so easy and secondly really versatile and easy to cater to different tastes.
See how easy it can be to cater to different tastes? These are great for lunches on the go or at home and especially good for picnics as you can easily make a big batch. I wouldn't recommend freezing them but they will keep in the fridge for a day.
I'd love to know ideas for what you put in yours...
Other good baby proof/ family recipes include Homemade Fish Fingers and Italian Shepherd's Pie
Emily x
You need 1 beaten egg per two 'quiches'. You'll also need:
- Milk (full fat if making for babies and toddlers)
- Your choice of filling and the possibilities are endless... Today I used some grated cheddar, spinach (washed and chopped) and a chopped spring onion.
If you are making them all the same simply put all the ingredients in a bowl and mix together. If you want to vary the ingredients (for example make adult and baby versions) put the common ingredients in the bowl (egg and milk for sure and whatever else) then pour into silicone muffin cases (either singles or a tray) being careful to leave room for the remaining ingredients. Such as...
Examples for babies/children (of course you can eat these too but you may want something a bit more adult):
- Cheese and tomato
- Cheese and onion
- Chicken (shredded quite small) and spinach
- Broccoli (lightly steamed) and blue cheese
- Chorizo, peppers and a dash of paprika on top
- Feta and sun dried tomatoes
I'd love to know ideas for what you put in yours...
Other good baby proof/ family recipes include Homemade Fish Fingers and Italian Shepherd's Pie
Emily x
Subscribe to:
Posts (Atom)