Wednesday, 6 May 2015
Wall Flowers
After re decorating the cafe the walls were a little bare but I didn't know what pictures / art I wanted up, then a saw this great idea for taping flowers to the wall in 'Decorate with Flowers' book by Holly Becker and Leslie Shewring, if you don't already own this book, you should! It's full of great interior ideas as well as flower ideas.
Supplies:
Flowers (real or artificial)
Wire clippers (if using artificial)
Washi tape or map pins
Unfortunately taping real flowers to the wall was a little unrealistic for long term, so I picked out a bunch of artificial ones and used wire clippers to separated them from the bunches.
Initially I wanted to use washi tape to adhere the flowers to the wall but due to the smooth surface of the wallpaper the tape just wouldn't stick. Maybe try tape first because it looks super cool but if that doesn't work I found map pins to be the perfect solution. They are cheap, discreet and worked a treat!
I didn't think too much about the lay out of the flowers I just kept pinning them up until I was happy with the result.
I'm so pleased with the outcome, the flowers break up the expanse of the brick wallpaper, add pops of colour, are really easy to put up and remove (great for renting) and bring a bit of a fresh spring feel inside in the winter months.
Monday, 13 April 2015
Card Printing
My fellow blogger friend over at www.thimbleandrose.com did this great post on this cheap and easy printing technique. So I decided to give it a go and make a couple of cards and I think they turned out great!
You will need:
A pencil
Soft thin sheets of foam
Poster paint or block printing ink
Lino rollers or a lint roller
A tile or something flat to roll ink on to
Paper or cards to print onto
Scissors
1. Find a image you like, I designed these using Illustrator or just free draw.
2. Hold the image up to the light, a window works well and use a pencil to trace the image. Then go over the image with a thick pencil, pressing quite hard to make a good indent in the foam. Then cut around the image.
3. Put some ink on the tile and use the roller to get a even ink coverage.
4. Roll the ink onto the image.

5. Press the image onto your paper/card/fabric, and press the image down without moving it. (If you have a spare clean roller use this to get a nice flat result)
6. Carefully lift off the image leaving your super ace print underneath!
7. Happy Printing!!
You will need:
A pencil
Soft thin sheets of foam
Poster paint or block printing ink
Lino rollers or a lint roller
A tile or something flat to roll ink on to
Paper or cards to print onto
Scissors
1. Find a image you like, I designed these using Illustrator or just free draw.
2. Hold the image up to the light, a window works well and use a pencil to trace the image. Then go over the image with a thick pencil, pressing quite hard to make a good indent in the foam. Then cut around the image.
3. Put some ink on the tile and use the roller to get a even ink coverage.
4. Roll the ink onto the image.

5. Press the image onto your paper/card/fabric, and press the image down without moving it. (If you have a spare clean roller use this to get a nice flat result)
6. Carefully lift off the image leaving your super ace print underneath!
7. Happy Printing!!
Friday, 27 March 2015
Dream Catcher Part 2
Last September we made dream catchers (click the link) in our craft club and my intention had always been to make lots of dream catchers and hang them all off a big branch, inspired by this pin.
As with many crafty intentions, it got put in a bag for 'finishing later' and got completely abandoned. I stumbled across the bag of half finished dream catchers the other day and after a hard word with myself about half finished projects, I finished it! I think this many dream catchers is going to lead to lots of happy dreaming.
(It also looks pretty boho hanging above my hippy blanket on my bed!)
As with many crafty intentions, it got put in a bag for 'finishing later' and got completely abandoned. I stumbled across the bag of half finished dream catchers the other day and after a hard word with myself about half finished projects, I finished it! I think this many dream catchers is going to lead to lots of happy dreaming.
(It also looks pretty boho hanging above my hippy blanket on my bed!)
Friday, 20 March 2015
Gluten Free Blueberry Almond Cake
This is a massive hit in the cafe, it's like a frangipani cake, what's not to like?! It's also really easy to make gluten free.
150g butter
150g sugar
3 eggs
Almond extract
100g ground almonds
80g self raising flour (or gluten free self raising flour, I used Doves)
200g blueberries (or any berries that are in season, fresh or frozen)
Large handful flaked almonds
Handful Demerara sugar
Grease and line a 10inch loose bottomed cake tin.
Beat the butter and sugar together until light and fluffy.
Next beat in the eggs and almond extract.
fold in the ground almond and flour.
Pour into the cake tin and sprinkle the blueberries on top, then cover with the flaked almonds and Demerara sugar.
Bake for 30 mins at 170 C until a skewer comes out clean.
150g butter
150g sugar
3 eggs
Almond extract
100g ground almonds
80g self raising flour (or gluten free self raising flour, I used Doves)
200g blueberries (or any berries that are in season, fresh or frozen)
Large handful flaked almonds
Handful Demerara sugar
Grease and line a 10inch loose bottomed cake tin.
Beat the butter and sugar together until light and fluffy.
Next beat in the eggs and almond extract.
fold in the ground almond and flour.
Pour into the cake tin and sprinkle the blueberries on top, then cover with the flaked almonds and Demerara sugar.
Bake for 30 mins at 170 C until a skewer comes out clean.
Wednesday, 18 March 2015
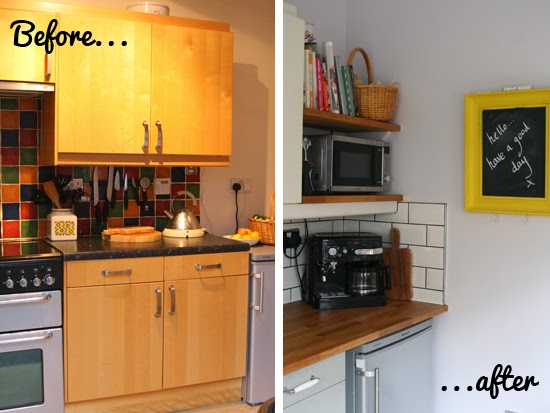
Refurbished Kitchen
When we moved into our lovely little home the kitchen wasn't really my taste but we didn't have the money to totally change it and put in a new one. Besides the one we had was perfectly functional it just didn't tick my aesthetic boxes.
So a few months ago I set to work transforming it and this is what we did for under £1000...
It took a while as I did the work in stages. I painted the cupboard doors (using Annie Sloan chalk paint and finished with lacquer) and replaced the handles. Luckily the kitchen is an IKEA one and so I was able to replace the handles with ones from IKEA that were the same size and thus no drilling or hole filling required - happy days!
We then enlisted the help of our joiner neighbour to replace the worktops and retile -this is what cost the most so if you are very handy you'll save yourself a small fortune!
Where there had been a fridge-freezer we replaced with an under counter fridge and gave ourselves some more worktop and some handy shelves - this has made the world of difference to using this kitchen.
Then paint the walls and woodwork and put up new blinds - all done and for less than £1000 I feel I have a brand new kitchen.
Em xx
Monday, 9 March 2015
Cafe Makeover
I have had my vintage inspired tea room 'Polly Put The Kettle on' for two and half years now and although I loved the decor, it was getting a little tired, and if I'm honest I was getting a little tired of it too. (Click the link to see what the cafe used to look like). I was reluctant to re decorate at first because I always received really lovely comments about its decor, but re wallpapering is a big effort and I didn't want to spend the time and money doing it for no body to notice (what can I say this girl loves a little attention for her efforts)
Once I got going on planning the 're vamp' the more I also wanted to change the name and have a re brand. This was also quite scary as the cafe is a success just as it is and there is that old saying 'why fix something that's not broken' but I'm a designer at heart and couldn't help myself.
Fortunately it completely paid off and was a risk worth taking. I received a great reception to the new look and the new name 'The Jam Jar'!
The re vamp has freshened up the cafe and re kindled my love for the place. (The 24hour turn around not seems like a distant memory)
Here's a sneak peak at The Jam Jar but you will have to visit to get the full experience.

Once I got going on planning the 're vamp' the more I also wanted to change the name and have a re brand. This was also quite scary as the cafe is a success just as it is and there is that old saying 'why fix something that's not broken' but I'm a designer at heart and couldn't help myself.
Fortunately it completely paid off and was a risk worth taking. I received a great reception to the new look and the new name 'The Jam Jar'!
The re vamp has freshened up the cafe and re kindled my love for the place. (The 24hour turn around not seems like a distant memory)
Here's a sneak peak at The Jam Jar but you will have to visit to get the full experience.

Subscribe to:
Posts (Atom)