Wednesday, 18 March 2015

Refurbished Kitchen

When we moved into our lovely little home the kitchen wasn't really my taste but we didn't have the money to totally change it and put in a new one. Besides the one we had was perfectly functional it just didn't tick my aesthetic boxes.

So a few months ago I set to work transforming it and this is what we did for under £1000...

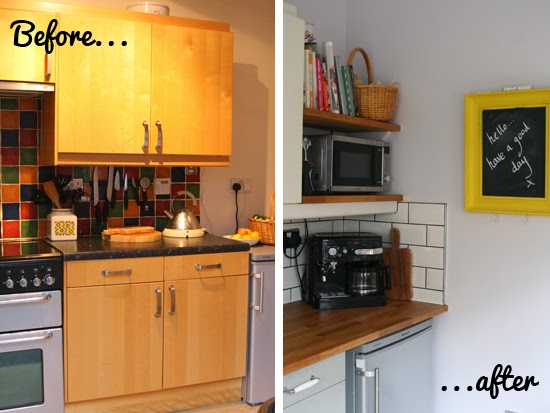
 
 
It took a while as I did the work in stages. I painted the cupboard doors (using Annie Sloan chalk paint and finished with lacquer) and replaced the handles. Luckily the kitchen is an IKEA one and so I was able to replace the handles with ones from IKEA that were the same size and thus no drilling or hole filling required - happy days!
 
We then enlisted the help of our joiner neighbour to replace the worktops and retile -this is what cost the most so if you are very handy you'll save yourself a small fortune!
 
Where there had been a fridge-freezer we replaced with an under counter fridge and gave ourselves some more worktop and some handy shelves - this has made the world of difference to using this kitchen.
 
Then paint the walls and woodwork and put up new blinds - all done and for less than £1000 I feel I have a brand new kitchen.


Em xx


Monday, 9 March 2015

Cafe Makeover

I have had my vintage inspired tea room 'Polly Put The Kettle on' for two and half years now and although I loved the decor, it was getting a little tired, and if I'm honest I was getting a little tired of it too. (Click the link to see what the cafe used to look like). I was reluctant to re decorate at first because I always received really lovely comments about its decor, but re wallpapering is a big effort and I didn't want to spend the time and money doing it for no body to notice (what can I say this girl loves a little attention for her efforts)

Once I got going on planning the 're vamp' the more I also wanted to change the name and have a re brand. This was also quite scary as the cafe is a success just as it is and there is that old saying 'why fix something that's not broken' but I'm a designer at heart and couldn't help myself.

Fortunately it completely paid off and was a risk worth taking. I received a great reception to the new look and the new name 'The Jam Jar'!

The re vamp has freshened up the cafe and re kindled my love for the place. (The 24hour turn around not seems like a distant memory)

Here's a sneak peak at The Jam Jar but you will have to visit to get the full experience.


Wednesday, 4 March 2015

Upcycled Blackboard

This is such an easy DIY and cheap as chips as you can often pick up frames in charity shops and at car boot sales. This one cost me £3 from a local Facebook selling page.
 
 
The process is simple... I painted the whole thing, picture and frame in a couple of coats of primer (best use a picture you don't really like so you don't feel guilty about that bit).
 
 
Once dry paint 2-3 coats of blackboard paint onto where the picture originally was. Leave for 24 hours before painting your frame (I'm too impatient and did it much too early, ending up with a fair bit of black in my yellow!)
 
I used a tester pot of emulsion which cost £1. I did a couple of coats. If you want a shiny finish, put a coat of varnish over the top or use gloss paint, I quite like the matt look though.
 
I then added a couple of cup hooks to the bottom of the frame so we have somewhere to hang notes and scraps of paper, held together with bulldog clips.
 
This now hangs in my newly updated kitchen... check back soon to see that transformation!
 
 
Em x


Wednesday, 25 February 2015

Homemade Play Dough

I recently bought some little pots of cheap play dough (I had planned to take it on a plane journey until the other half pointed out that it looks like explosive), we had a play with it today. Suffice to say we didn't play with it for long, it smelt like chemicals and was really sticky. £1.50 wasted as it went in the bin. So I thought I'd try making some, especially as when I looked at recipes I had everything in the cupboard except for food colouring.

The recipe I used was:

2 cups of plain flour
2 cups of warm water
1 cup of salt
4 dessert spoons of vegetable oil
3 teaspoons of Cream of Tartar (or 3 sachets)
Food colouring (I bought primary colours and mixed to also make green, purple and orange)

 
I was expecting this to be a messy job that I'd regret starting but it was so easy! Simply put all the ingredients (except the food colouring) in a pan on the hob and heat until it binds together and is no longer 'wet.' If it is still sticking to your hand rather than itself heat it a little longer, it took 5-7minutes for me. It should look like this...
 
 
Allow it to cool and then knead together so it is smooth. I did this on a tray just in case any stuck to the worktop. Next separate into the number of colours you have. Make a dent in each of your balls of dough and add your colours. At this point I also added some essential oil to some of the balls to make it an extra sensory experience. Knead the food colouring into each ball - being sure to wash your hands in between so you don't contaminate the different colours.
 
 
Now get creative!
 
You can store the play dough in an air tight box. If it starts to dry out your can add a little water or equally if it gets sticky you can reheat it. I haven't tried either of these methods yet and it might be easier to just start again.


Happy moulding!
Em xx


Tuesday, 24 February 2015

DIY: Play Kitchen

Ever since Millie was a teeny, tiny thought I have been checking out DIY play kitchens (mainly on Pinterest!) so I was incredibly excited to get started with my own project as her Christmas present.

The first challenge is finding the right piece of furniture to upcycle. I found this TV cabinet at an auction, it is a little on the large size but it means it provides plenty of storage. 

 
For the sink I used a dog bowl and painted door knobs for the taps. The faucet was the most difficult part and took a little trial and error. I spray painted a plastic plumbing pipe, filled it with expanding foam and glued in some wooden dowels. The dowels stop the faucet from just snapping off (this happened a couple of times before I worked out how to fix it). I also added some blue fabric before the foam set to look like water. The hob it made from circles cut from cork board and four spray painted door knobs.


At 19 months Millie mainly bangs about the food and takes the lids on and off pans, but this will be a toy that grows with her. We had our 10 year old nieces over in the holidays and they loved it, so it may not have been the cheapest option when it comes to play kitchens but I'm hoping it will be played with for a long time to come. 
 
 
Happy (play) cooking!
Em xx


Thursday, 19 February 2015

DIY: Maxi Nightie

I suffered wearing pajama bottoms for years, waking up with them all twisted and uncomfortable. 
So I decided that I give nighties a go, normally categorizing them with little girls and granny's or something more racy than necessary for actually sleeping in. I found a couple of nice jersey nighties with a little stretchy lace detail around the top, then discovered the maxi version. Even better, warm, comfortable, and you can answer the door without feeling totally exposed in your nightwear. I only managed to purchase one of these before they stopped stocking them and I've never found one since so after some searching I decided to make one.
This is a very simple sewing project and I recommend you think about rocking a maxi nightie.

You will need: 
1 x 1.5 meter jersey fabric
1 meter elasticated lace trim
1/2 meter elastic for straps (approx. 0.5cm thick)
Thread in matching colors to your jersey and lace
Sewing machine
Fabric scissors
Pins

1. Cut out two pieces of jersey. Starting 30cm width at the top and graduating out to 70cm and 120cm in length. (I cut on the fold so the photo below is one piece folded in half)
2. Sew up the side seams, right sides together.
3. Sew the elastic lace to the top of the nightie. You might needed to sew along the top and the bottom depending on the depth of your lace.
4. Sew on your straps about 4 inches from each side seam. (I left the bottom because jersey just rolls)
Team with some leggings and a comfy jumper for lounging in.