Last September we made dream catchers (click the link) in our craft club and my intention had always been to make lots of dream catchers and hang them all off a big branch, inspired by this pin.
As with many crafty intentions, it got put in a bag for 'finishing later' and got completely abandoned. I stumbled across the bag of half finished dream catchers the other day and after a hard word with myself about half finished projects, I finished it! I think this many dream catchers is going to lead to lots of happy dreaming.
(It also looks pretty boho hanging above my hippy blanket on my bed!)
Friday, 27 March 2015
Friday, 20 March 2015
Gluten Free Blueberry Almond Cake
This is a massive hit in the cafe, it's like a frangipani cake, what's not to like?! It's also really easy to make gluten free.
150g butter
150g sugar
3 eggs
Almond extract
100g ground almonds
80g self raising flour (or gluten free self raising flour, I used Doves)
200g blueberries (or any berries that are in season, fresh or frozen)
Large handful flaked almonds
Handful Demerara sugar
Grease and line a 10inch loose bottomed cake tin.
Beat the butter and sugar together until light and fluffy.
Next beat in the eggs and almond extract.
fold in the ground almond and flour.
Pour into the cake tin and sprinkle the blueberries on top, then cover with the flaked almonds and Demerara sugar.
Bake for 30 mins at 170 C until a skewer comes out clean.
Wednesday, 18 March 2015
Refurbished Kitchen
When we moved into our lovely little home the kitchen wasn't really my taste but we didn't have the money to totally change it and put in a new one. Besides the one we had was perfectly functional it just didn't tick my aesthetic boxes.
So a few months ago I set to work transforming it and this is what we did for under £1000...
It took a while as I did the work in stages. I painted the cupboard doors (using Annie Sloan chalk paint and finished with lacquer) and replaced the handles. Luckily the kitchen is an IKEA one and so I was able to replace the handles with ones from IKEA that were the same size and thus no drilling or hole filling required - happy days!
We then enlisted the help of our joiner neighbour to replace the worktops and retile -this is what cost the most so if you are very handy you'll save yourself a small fortune!
Where there had been a fridge-freezer we replaced with an under counter fridge and gave ourselves some more worktop and some handy shelves - this has made the world of difference to using this kitchen.
Then paint the walls and woodwork and put up new blinds - all done and for less than £1000 I feel I have a brand new kitchen.
Em xx
Monday, 9 March 2015
Cafe Makeover
I have had my vintage inspired tea room 'Polly Put The Kettle on' for two and half years now and although I loved the decor, it was getting a little tired, and if I'm honest I was getting a little tired of it too. (Click the link to see what the cafe used to look like). I was reluctant to re decorate at first because I always received really lovely comments about its decor, but re wallpapering is a big effort and I didn't want to spend the time and money doing it for no body to notice (what can I say this girl loves a little attention for her efforts)
Once I got going on planning the 're vamp' the more I also wanted to change the name and have a re brand. This was also quite scary as the cafe is a success just as it is and there is that old saying 'why fix something that's not broken' but I'm a designer at heart and couldn't help myself.
Fortunately it completely paid off and was a risk worth taking. I received a great reception to the new look and the new name 'The Jam Jar'!
The re vamp has freshened up the cafe and re kindled my love for the place. (The 24hour turn around not seems like a distant memory)
Here's a sneak peak at The Jam Jar but you will have to visit to get the full experience.

Wednesday, 4 March 2015
Upcycled Blackboard
This is such an easy DIY and cheap as chips as you can often pick up frames in charity shops and at car boot sales. This one cost me £3 from a local Facebook selling page.
The process is simple... I painted the whole thing, picture and frame in a couple of coats of primer (best use a picture you don't really like so you don't feel guilty about that bit).
Once dry paint 2-3 coats of blackboard paint onto where the picture originally was. Leave for 24 hours before painting your frame (I'm too impatient and did it much too early, ending up with a fair bit of black in my yellow!)
I used a tester pot of emulsion which cost £1. I did a couple of coats. If you want a shiny finish, put a coat of varnish over the top or use gloss paint, I quite like the matt look though.
I then added a couple of cup hooks to the bottom of the frame so we have somewhere to hang notes and scraps of paper, held together with bulldog clips.
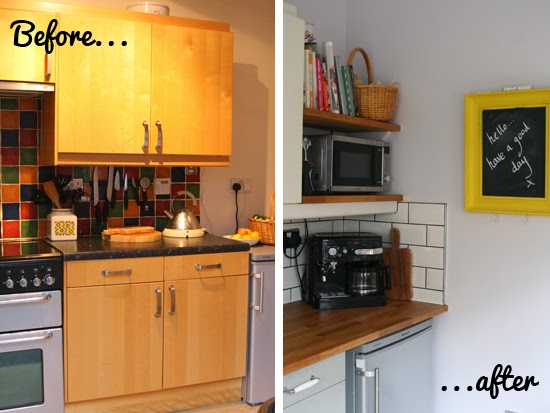
This now hangs in my newly updated kitchen... check back soon to see that transformation!
Em x
Subscribe to:
Posts (Atom)